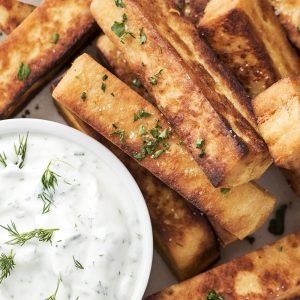
Chickpea Fries
Chickpea fries, also known as panisse in some regions, are a delightful and nutritious alternative to traditional potato fries. Made primarily from chickpea flour and water, these fries offer a unique taste and texture that is both crispy on the outside and creamy on the inside. They are seasoned with various herbs and spices, which can be adjusted to personal preference, adding depth and versatility to their flavor profile.
Equipment
- 1 saucepan
Ingredients
- 2 cups/184g Chickpea/Gram/Besan flour
- 4 cups/940ml Water
- 1 tsp Salt
- 1 tsp Ground white pepper
- Oil to grease the dish
- Oil to shallow fry
Instructions
- Place the water in a saucepan and bring to a boil.
- Even though I used super fine chickpea flour, I would highly recommend you measure out the flour and give it a sift yourself. I had to throw away my first batch because it was far too lumpy.
- Once the water has boiled, reduce the heat and add the flour to the saucepan.
- Using a whisk and a lot of elbow grease, give the contents a mix as quickly as you can because it can go lumpy very fast. Just note, it won’t be completely mixed no matter how hard you try. The beauty of this recipe is that it doesn’t matter – it will still look good and taste great. I reckon if you had a food processor, the results could be much smoother. But I haven’t tried this out myself, so I’m just speculating here.
- At this point, I’d got the mixture as smooth as I possibly could. Although the recipe didn’t call for it, I decided to add some salt and pepper for seasoning. The mixture has a strong chickpea smell (obviously), so not having some kind of seasoning didn’t make sense to me as it would be rather bland otherwise. I had no idea what the end result would taste like, but in hindsight, I wish I had added some fresh herbs and a pinch of garlic granules at this stage. But I know I’ll definitely do that next time and it will be even more amazing.
- Get a Pyrex type of dish (I used a 10″ x 8″) or a tin that has been lined with clingfilm, and grease it with some oil. I have spraying oil at home so I used that, but you can also brush the oil on. This is so that its comes out of the dish fairly easily later on. Try and grease the dish earlier on if possible, because the mixture sets really quickly once off the heat.
- Pour the mixture into the dish and spread it as evenly as possible, making sure to push it into the corners.
- Place some clingfilm directly on top and place in the fridge to chill for at least 2 hours. I actually made this 24 hours before I intended to use it, and it still worked out great. So it’s definately ideal to make in advance when you know you won’t have much time the next day. Making this is easy… it’s the chilling that takes the longest.
- When ready to use, take it out the fridge and take the cling film off. Place it upside down on top of a chopping board and gently tap the bottom of the dish to help it become loose and come away from the sides.
- As we want the fries to be equal in size and shape, trim the edges and keep aside (these were bonus bits for me later – chef’s treat!).
- Slice the block in half lengthways and cut into approximately 16 chunky fries/chips. Try and get the thickness the same from all sides.
- Add the frying oil into your pan (mine was about half an inch deep) and fry your chips when the oil is hot enough. I did this in two batches as I wanted them to cook evenly.
- Fry for 2-3 minutes on each side or until golden.
- When it’s done, take the fries out and place on kitchen paper/towel to soak up any excess oil and sprinkle some salt on top immediately whilst it’s still hot.
- I may have cheated and bought some ready made dips to save some time, but you can make your own using your favourite recipes. I went for the sour cream and chive and tomato salsa combo and it was DELICIOUS.